git常用命令/git windows工具使用/mac

Git常用命令

分支合并和rebase

1
2
3
4
5
6
7
git merge <branch> # 将branch分支合并到当前分支

git merge origin/master --no-ff # 不要Fast-Foward合并,这样可以生成merge提交

git rebase master <branch> # 将master rebase到branch,相当于: git co <branch> && git rebase master && git co master && git merge <branch>

git cherry-pick <commit id> # 合并单个commit到当前的分支当中

Git补丁管理(方便在多台机器上开发同步时用)

1
2
3
4
5
git diff > ../sync.patch # 生成补丁

git apply ../sync.patch # 打补丁

git apply --check ../sync.patch #测试补丁能否成功

Git暂存管理

1
2
3
4
5
6
7
git stash # 暂存

git stash list # 列所有stash

git stash apply # 恢复暂存的内容

git stash drop # 删除暂存区

Git远程分支管理

1
2
3
4
5
6
7
8
9
10
11
12
13
14
15
16
17
18
19
20
21
22
23
git pull # 抓取远程仓库所有分支更新并合并到本地

git pull --no-ff # 抓取远程仓库所有分支更新并合并到本地,不要快进合并

git fetch origin # 抓取远程仓库更新

git merge origin/master # 将远程主分支合并到本地当前分支

git co --track origin/branch # 跟踪某个远程分支创建相应的本地分支

git co -b <local_branch> origin/<remote_branch> # 基于远程分支创建本地分支,功能同上

git push # push所有分支

git push origin master # 将本地主分支推到远程主分支

git push -u origin master # 将本地主分支推到远程(如无远程主分支则创建,用于初始化远程仓库)

git push origin <local_branch> # 创建远程分支, origin是远程仓库名

git push origin <local_branch>:<remote_branch> # 创建远程分支

git push origin :<remote_branch> #先删除本地分支(git br -d <branch>),然后再push删除远程分支

Git远程仓库管理

1
2
3
4
5
6
7
8
9
GitHub

git remote -v # 查看远程服务器地址和仓库名称

git remote show origin # 查看远程服务器仓库状态

git remote add origin git@ github:robbin/robbin_site.git # 添加远程仓库地址

git remote set-url origin git@ github.com:robbin/robbin_site.git # 设置远程仓库地址(用于修改远程仓库地址) git remote rm <repository> # 删除远程仓库

创建远程仓库

1
2
3
4
5
6
7
8
9
10
11
12
13
14
15
16
17
18
19
git clone --bare robbin_site robbin_site.git # 用带版本的项目创建纯版本仓库

scp -r my_project.git git@ git.csdn.net:~ # 将纯仓库上传到服务器上

mkdir robbin_site.git && cd robbin_site.git && git --bare init # 在服务器创建纯仓库

git remote add origin git@ github.com:robbin/robbin_site.git # 设置远程仓库地址

git push -u origin master # 客户端首次提交

git push -u origin develop # 首次将本地develop分支提交到远程develop分支,并且track

git remote set-head origin master # 设置远程仓库的HEAD指向master分支

也可以命令设置跟踪远程库和本地库

git branch --set-upstream master origin/master

git branch --set-upstream develop origin/develop

windows中git工具sourceTree的使用

  1. 在电脑中先要安装git windows版本 点此下载
  2. sourceTree可以百度去其他下载站下载,官网有被强同时安装的时候要输入google账户,下载站的关闭后在打开后就不需要了
  3. 安装完后要在windows中生成ssh key。鼠标右键桌面点击git base here,弹出命令框
  4. 命令框中键入命令:ssh-keygen -t rsa -C “email@email.com“,在你的用户目录就会生成 .ssh文件夹
  5. 打开id_rsa.pub文件,在你需要上传的git上添加ssh key
  6. sourceTree打开->工具->选项->ssh客户端配置,选择ssh链接。sourceTree的ssh配置完成。接下来可以克隆新建仓库了

git远程分支的操作

1
2
3
4
5
6
7
8
9
10
11
12
13
14
15
16
17
18
19
git branch <branch>  //创建新的分支
git checkout <branch> //就可以进入新的分支
git push origin <branch> // 将新的分支推上远程
git push origin :<branch> // 删除远程分支
git branch -d <branch> // 删除本地分支
** git pull 提示拉哪个分支代码
** git pull origin <branch> // 可以使用这个命令,也可以使用下一行代码直接固定
**git branch --set-upstream-to=origin/<branch>
删除未提交的文件
# 删除 untracked files
git clean -f
# 连 untracked 的目录也一起删掉
git clean -fd
# 连 gitignore 的untrack 文件/目录也一起删掉 (慎用,一般这个是用来删掉编译出来的 .o之类的文件用的)
git clean -xfd
# 在用上述 git clean 前,墙裂建议加上 -n 参数来先看看会删掉哪些文件,防止重要文件被误删
git clean -nxfd
git clean -nf
git clean -nfd

git中文路径名或者文件名被转义

1
git config --global core.quotepath false  // 将转义设为关闭

git添加tag标签

1
2
git tag -a v2.0.0 -m "商城更改重大版本"
git push origin --tag // 将本地的tag标签进行全部推送

git添加的分支要对应远程

1
git branch --set-upstream-to=origin/2.0.x 2.0.x

gitk出现错误

1
2
3
4
5
6
7
8
9
10
11
12
Error in startup script: unknown color name "lime"
(processing "-fore" option)
invoked from within
"$ctext tag conf m2 -fore [lindex $mergecolors 2]"
(procedure "makewindow" line 347)
invoked from within
"makewindow"
(file "/usr/local/bin/gitk" line 12434)
方法1:brew cask install tcl (未测试)
方法2:cp /usr/local/bin/gitk /usr/local/bin/gitk.bkp
vi /usr/local/bin/gitk
:%s/lime/"#99FF00"/g

windows下使用git命令

在windows是使用git

  1. 在windows的git bash中用ssh-keygen -t rsa -C “XXX@company.com“生成了密钥对
  2. 这样会在c/Users/[用户组]/.ssh/id_rsa下面生成ssh文件

gitlab-runner配置使用

gitlab-runner是和gitlab紧密结合的构建工具,本篇文章使用docker进行构建(docker自己参考百度)

  1. jenkins是很流行的可以和很多其他工具结合的一个构建工具。
  2. gitlab-runner看名字就知道只和gitlab结合。

docker pull镜像速度很慢

  1. 参考 文档

关于gitlab-ci

  1. 网上一搜很多关于安装gitlab-ci和gitlab-runner。
  2. 这里我说下,新版gitlab从8.0以上起,就已经集成了gitlab-ci。不需要额外安装。只需要安装gitlab-runner

docker安装gitlab,最新的版本

  1. docker pull sameersbn/gitlab:latest (官方镜像)

  2. 运行gitlab,443 22端口经常会冲突。这里我替换掉了,个人看情况使用

    1
    2
    3
    4
    5
    6
    7
    8
    9
    docker run --detach \
    --hostname ipxxx.xxx.xx \
    --publish 7043:443 --publish 7070:80 --publish 7022:22 \
    --name gitlabs \
    --restart always \
    --volume /srv/gitlab/config:/etc/gitlab \
    --volume /srv/gitlab/logs:/var/log/gitlab \
    --volume /srv/gitlab/data:/var/opt/gitlab \
    sameersbn:latest
  3. 更详细参考gitlab配置github

docker安装gitlab-runner

  1. docker pull gitlab/gitlab-runner

  2. 运行gitlab-runner

    1
    2
    3
    4
    docker run -d --name gitlab-runner --restart always \
    -v /var/run/docker.sock:/var/run/docker.sock \
    -v /srv/gitlab-runner/config:/etc/gitlab-runner \
    gitlab/gitlab-runner:latest
  3. 详细参考docker-gitlab-runner

配置Gitlab Runner

  1. 进入gitlab-runner容器里面

  2. 要在gitlab中添加一个runner,只需要执行:gitlab-runner register 进行注册管道

    1
    2
    3
    4
    5
    6
    7
    8
    9
    10
    11
    12
    13
    14
    15
    16
    17
    gitlab-runner register

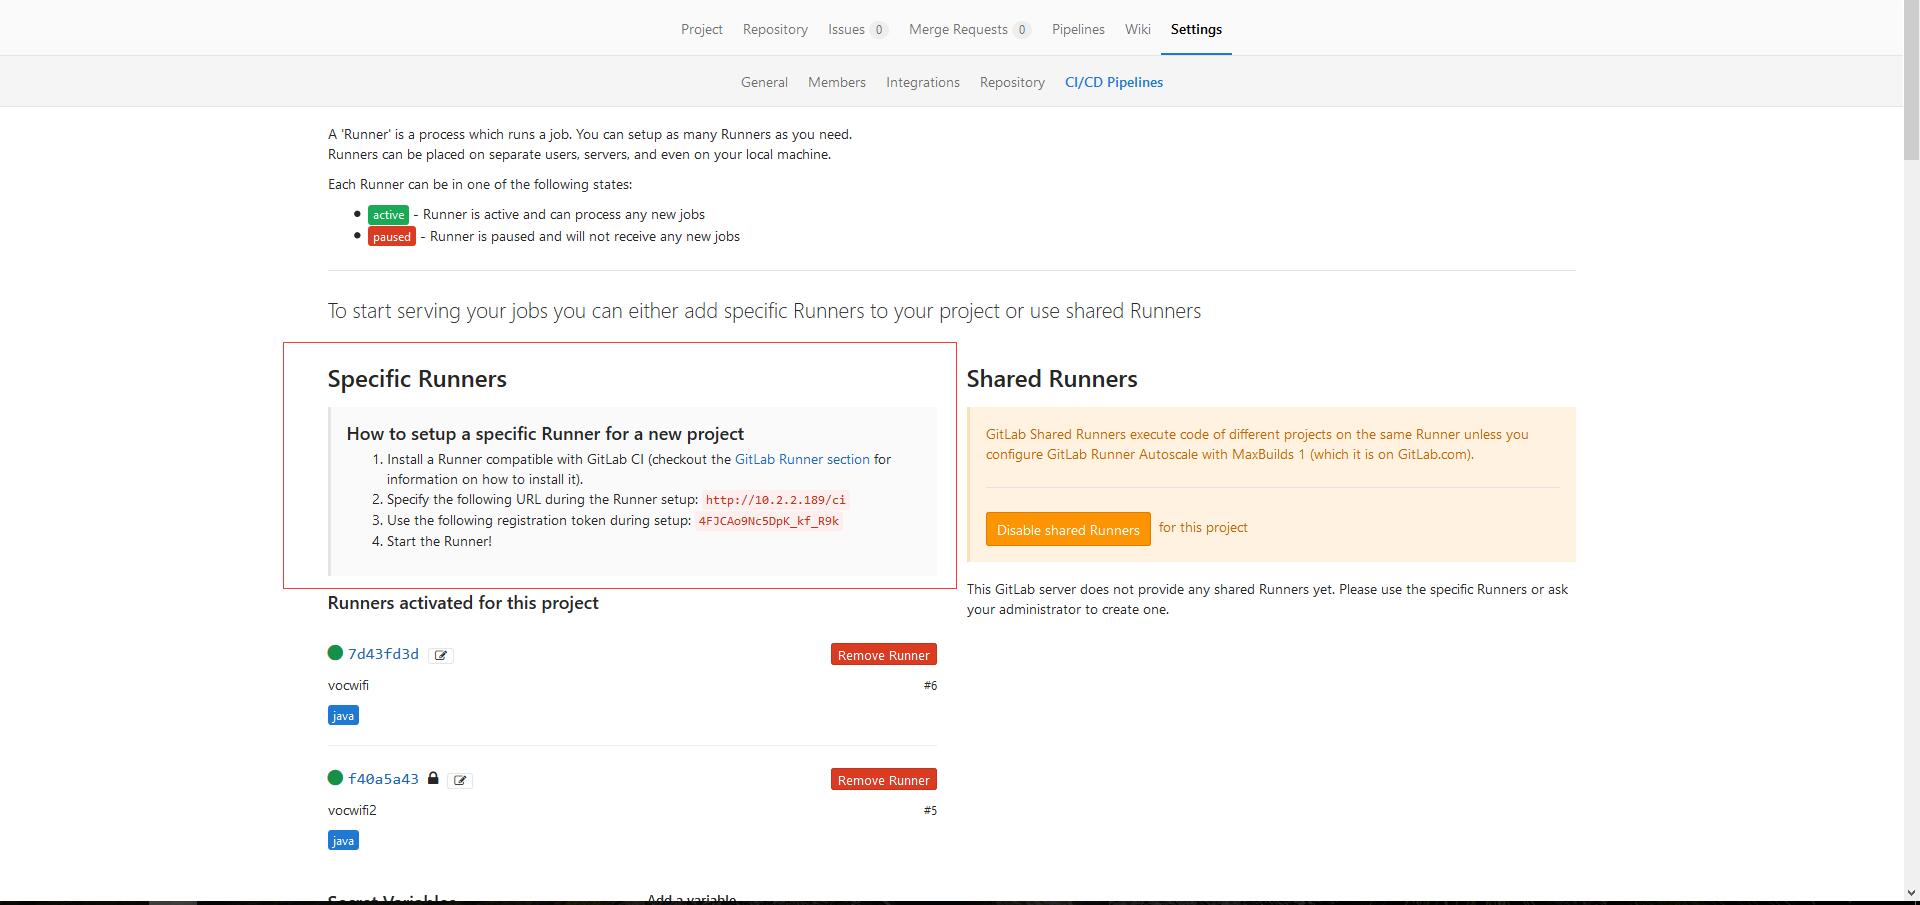
    Please enter the gitlab-ci coordinator URL (e.g. https://gitlab.com )
    ## 输入你的gitlab地址 在gitlab项目的设置中查看pipelines中的url。不是项目的url
    Please enter the gitlab-ci token for this runner
    ## gitlab的token(在gitlab的Admin Area中) 或者仓库的token(仓库->设置->Runner)
    Please enter the gitlab-ci description for this runner
    ## Runner描述信息
    Please enter the gitlab-ci tags for this runner (comma separated):
    ## Runner的标签 可以指定仓库 只使用固定标签的Runner构建
    Whether to run untagged builds [true/false]:
    [false]: ## 这里我选择true,意思是是否在打了tag的运行。false是在tag上运行,true提交了就可以使用该管道编译
    Whether to lock Runner to current project [true/false]:
    [false]: ## 是否锁住管道,暂时没弄明白 false 吧
    Please enter the executor: parallels, shell, ssh, virtualbox, docker+machine, docker-ssh+machine, docker, docker-ssh, kubernetes:
    docker ## 这里我们选择shell 先来个简单的
    Runner registered successfully. Feel free to start it, but if it's running already the config should be automatically reloaded!
  3. 上面的图形说明
    运行的记录
    url和token的配置

gitlab-runner配置好了。在要项目的根路径添加.gitlab-ci.yml 才会运行

  1. 简单的运行

    1
    2
    3
    4
    5
    6
    7
    8
    9
    10
    11
    12
    13
    14
    15
    16
    17
    18
    before_script:
    - echo "before_script"
    # 定义 stages
    stages:
    - build
    - test
    # 定义 job
    job1:
    stage: test
    script:
    - echo "I am job1"
    - echo "I am in test stage"
    # 定义 job
    job2:
    stage: build
    script:
    - echo "I am job2"
    - echo "I am in build stage"
  2. 项目推上去就可以看到编译的结果打印输入上面的echo

这里我多写的只是如何使用,可以参考概念说明,2者结合能够真正掌握它的意思

gitlab-runner的概念说明

gitlib备份sh脚本

gitLib定时备份代码

  1. 在备份的电脑创建git账户。useradd gitlib 。生成ssh密钥放入gitlib中

  2. 编写sh脚本

    1
    2
    3
    4
    5
    6
    7
    8
    9
    10
    11
    12
    13
    14
    15
    16
    17
    18
    19
    20
    21
    22
    #!/bin/sh
    # 用来定时备份test12的git代码

    # 当前shell脚本所在的目录
    TIME="date +%Y-%m-%d.%H:%M:%S"
    DIR="$( cd "$( dirname "${BASH_SOURCE[0]}" )" && pwd )"
    # 获取gitlib上的需要备份的项目
    PROJECT=(xxx zzz yyy)
    # 遍历上面的项目,确保在一组当中
    for DATA in ${PROJECT[@]}
    do
    DIR="$( cd "$( dirname "${BASH_SOURCE[0]}" )" && pwd )"
    echo "`$TIME` ----$DATA开始进行备份 $DIR";
    if [ -d $DIR/$DATA ]; then
    cd $DIR/$DATA
    back=`git pull`
    cd $DIR
    else
    back=`git clone git@git.kingsilk.xyz:kingsilk/$DATA.git`
    #echo "xxx"
    fi
    done;
  3. 执行 chmod +x script.sh赋予执行权限

  4. gitlib定时拉取代码 表示每小时执行一次备份

    1
    2
    crontab -e
    0 * * * * /home/gitlib/back/gitLibBack.sh 2>&1 >> /home/gitlib/back/gitLibBack.log
  5. gitlab命令

    1
    2
    3
    4
    5
    6
    7
    8
    9
    docker run --detach \
    --hostname 10.2.2.189 \
    --publish 7043:443 --publish 7070:80 --publish 7022:22 \
    --name gitlabs \
    --restart always \
    --volume /srv/gitlab/config:/etc/gitlab \
    --volume /srv/gitlab/logs:/var/log/gitlab \
    --volume /srv/gitlab/data:/var/opt/gitlab \
    registry.cn-hangzhou.aliyuncs.com/acs-sample/gitlab-sameersbn:latest

grails3开发

grails3开发

gradle的依赖本地项目

1
2
3
4
注:gradle 在我们国内有时候快有时候慢,gradle是google的项目
grails引入其他项目做为依赖项目,官网介绍在专门的一张plugins中
-->在主工程目录settings.gradle 添加 include '额外工程名',还有includeFlat。include/includeFlat 意思都是引入,但是层级不一样。自行学习
-->在build.gradle中添加compile project(':额外工程名')

gradle的学习

  1. 代码csdn地址
    1
    2
    3
    4
    5
    6
    7
    新建gradleTestOne,gradleTestTwo作为子项目,用于多模块构建,为了方便,作为子节点存在,使用include引用。不使用includeFlat
    创建java项目:格式如下:
    └── src
    └── main
    └── java
    └── OneTest
    IDEA在右侧栏有gradle project的窗口,可以提供快捷的操作,不需要在命令行执行gradle build,run命令

grails2升级grails3

1
2
3
4
5
6
7
8
9
10
11
12
问题1:org.springframework.beans.factory.UnsatisfiedDependencyException: Error creating bean with name 'redisMessageListenerContainer' defined in class path resource [org/springframework/session/data/redis/config/annotation/web/http/RedisHttpSessionConfiguration.class]: Unsatisfied dependency expressed through constructor argument with index 0 of type [org.springframework.data.redis.connection.RedisConnectionFactory]: No qualifying bean of type [org.springframework.data.redis.connection.RedisConnectionFactory] is defined: expected single matching bean but found 2: redisConnectionFactory,jedisConnectionFactory; nested exception is org.springframework.beans.factory.NoUniqueBeanDefinitionException: No qualifying bean of type [org.springframework.data.redis.connection.RedisConnectionFactory] is defined: expected single matching bean but found 2: redisConnectionFactory,jedisConnectionFactory
解决:grails3是不是不支持resouce注入
1. 在src/main/groovy/
@EnableRedisHttpSession // <1>
public class Config {
@Bean
public JedisConnectionFactory connectionFactory() {
JedisConnectionFactory jedisConnectionFactory = new JedisConnectionFactory();
return jedisConnectionFactory; // <2>
}
}
2. 记得在init/Application上加上@ComponentScan("上面文件路径包名")

grails3的domain时候save不出错误日志

1
failOnError: true

java开发文档规范

代码添加注释

  1. 文档参考处groovy doc文档

  2. 以下自己见解

    1
    2
    3
    4
    5
    6
    7
    8
    9
    10
    11
    12
    13
    14
    15
    16
    17
    18
    19
    20
    21
    22
    /**
    * 在此处添加对整个类的大致说明
    * 添加@符后面会直接添加到文档的说明处
    * @version 1.0
    */
    class Person {
    /** 在这里添加对属性的注释 */
    String name

    /**
    * 对方法的说明,此行开始到@param处一直是方法的说明
    *
    * @param otherPerson ;对参数名的解释,请加(;)符号分割,
    * @return 简单的renturn介绍,到后面都是return的介绍
    * @return 这里也算return的介绍,但是会换行。也可以不加,建议加
    * @throws 方法抛出的异常
    */
    String greet(String otherPerson) {
    // 在方法体内注册 使用 //;使用/** xxx */会是注释和下一个方法无法绑定,
    "Hello ${otherPerson}"
    }
    }
  3. disruptor

idea的一些常用设置

idea的一些常用设置

  1. 更改背景颜色

    1
    2
    File->settings->editor->colors&Fonts->General
    右边复制一份,选择:Text->Default text 勾选background 选择199 237 204;RGB:#C7EDCC
  2. 更换提示按键

    1
    2
    3
    4
    File->settings->keyMap 右边选择eclipse 同时点击保存复制
    修改代码提示按键:点击搜索
    1. 移除原来的Cycle Expand Word 的 Alt+斜杠 快捷键绑定。
    2. 在 Basic 上点击右键,去除原来的 Ctrl+空格 绑定,然后添加 Alt + 斜杠 快捷键。
  3. 更换字体

    1
    2
    File->settings->editor->colors&Fonts->Font
    size:16 字体:courier New
  4. 项目清空缓存

    1
    2
    File -> Invalidate caches
    Build->Reubuild Project
  1. 关闭面板
    1
    搜索ctrl+W  去除掉,选择:editor tabs->close添加ctrl+w

idea中调试tomcat代码

idea中调试Tomcat源代码

  1. 代码跟踪时tomcat进入的代码有时候会错误。和正在使用tomcat不符合。在pom下新增以下代码进行指定
    1
    2
    3
    4
    5
    6
    <dependency>
    <groupId>org.apache.tomcat</groupId>
    <artifactId>tomcat-catalina</artifactId>
    <version>8.5.35</version>
    <scope>provided</scope>
    </dependency>

centos安装docker

centos安装docker

centos内核低于3.8处理,通过yum安装

  • 第一步,先看目前的内核版本 uname -r

  • 第二步,导入public key: rpm –import https://www.elrepo.org/RPM-GPG-KEY-elrepo.org

  • 第三步,安装ELRepo: rpm -Uvh http://www.elrepo.org/elrepo-release-6-6.el6.elrepo.noarch.rpm

  • 第四步,安装内核

    1
    2
    3
    在yum的ELRepo源中,有mainline(4.6)、long-term(3.10)这2个内核版本,考虑到long-term更稳定,会长期更新,所以选择这个版本。
    查看ELRepo源中内核:http://elrepo.org/linux/kernel/el6/x86_64/RPMS/
    安装命令: yum --enablerepo=elrepo-kernel install kernel-lt -y
  • 第五步,编辑grub.conf,修改Grub引导顺序

    1
    vim /etc/grub.conf  确认刚安装好的内核在哪个位置,然后设置default值(从0开始),一般新安装的内核在第一个位置,所以设置default=0。
  • 第六步,重启,查看内核版本号

参考资料:
http://elrepo.org/tiki/tiki-index.php

ios推送证书的设置

苹果推送证书设置

为你的 App 创建 App ID

iOS 中每个 App 都需要对应一个 App ID,同一个公司可能会使用类似于 com.example.* 这样通用的 App ID,但是如果要在 App 中加入消息推送功能,那么是不能使用通用 ID 的,需要为之单独创建一个。

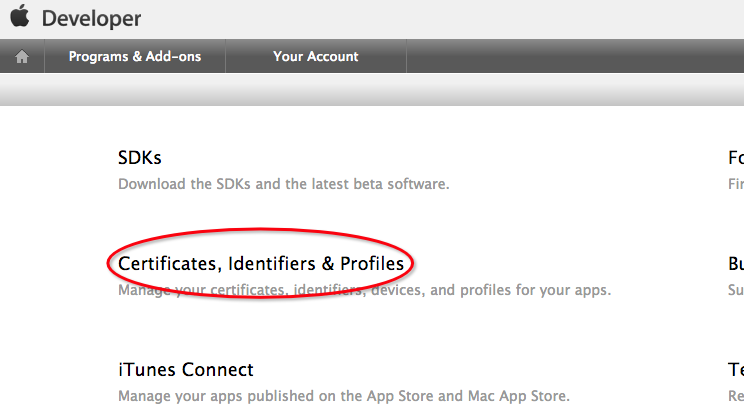
首先登陆 iOS Dev Center ,然后进入 Member Center,然后选择 Certificates,Identifiers & profiles,如下图:

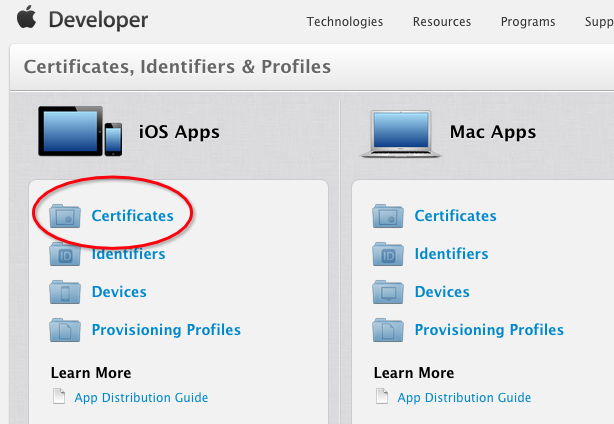
然后点击下图红框中的任意条目,进入证书界面,如下图:

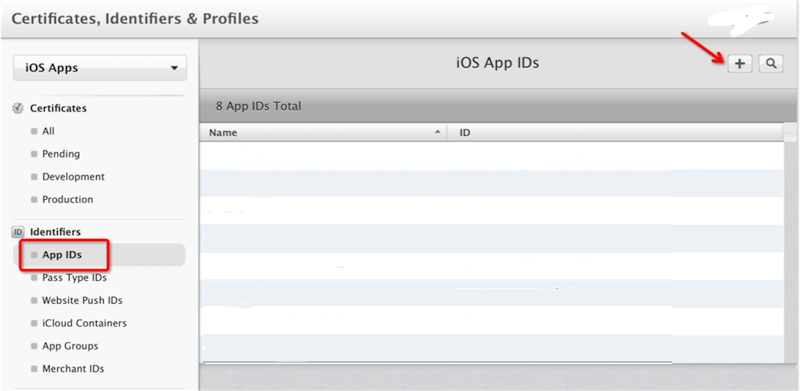
在进入证书界面后,在左边的Identifiers选择中选定App IDs,点右上角加号创建Appid,如下图:

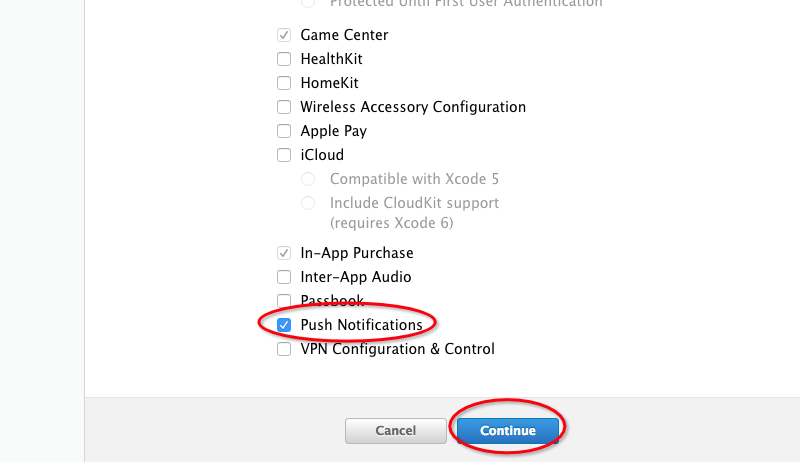
在创建 App ID 的过程中,需要勾选 Push 服务,如下图:

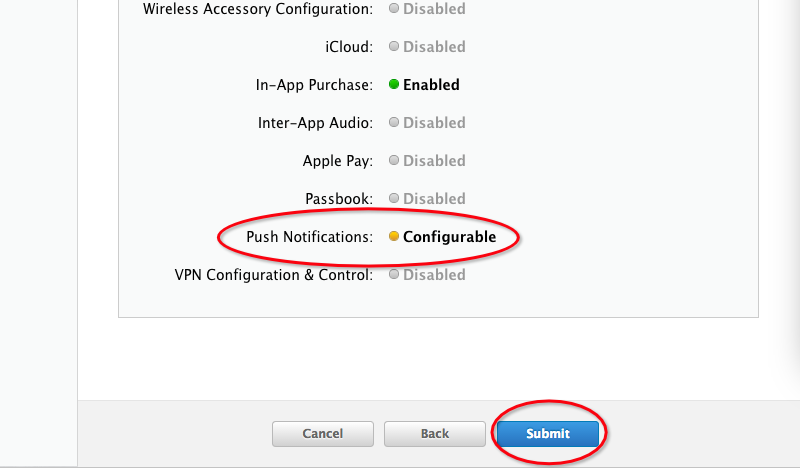
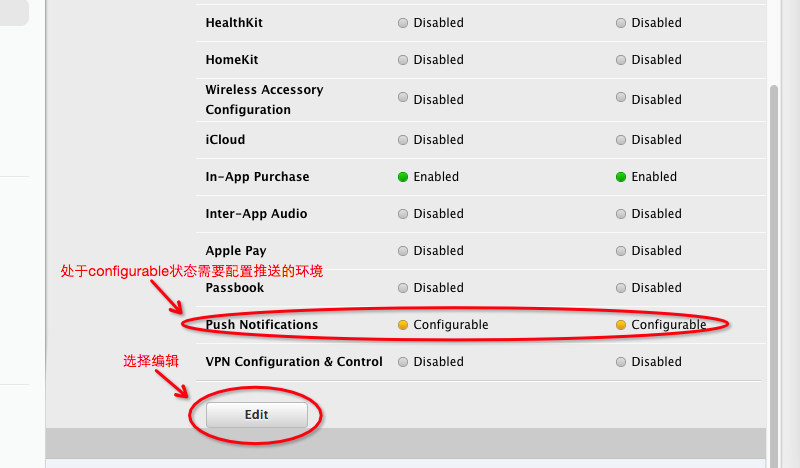
进入提交页面,push服务处于configurable状态,如下图:

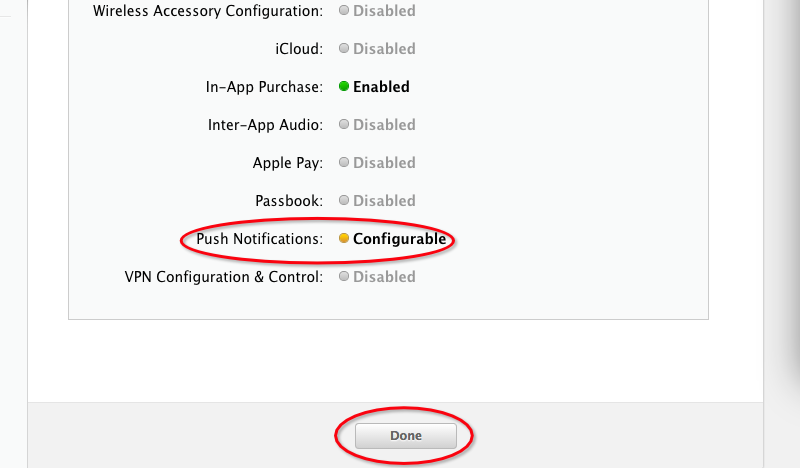
点击submit后到确认页面,如下图:

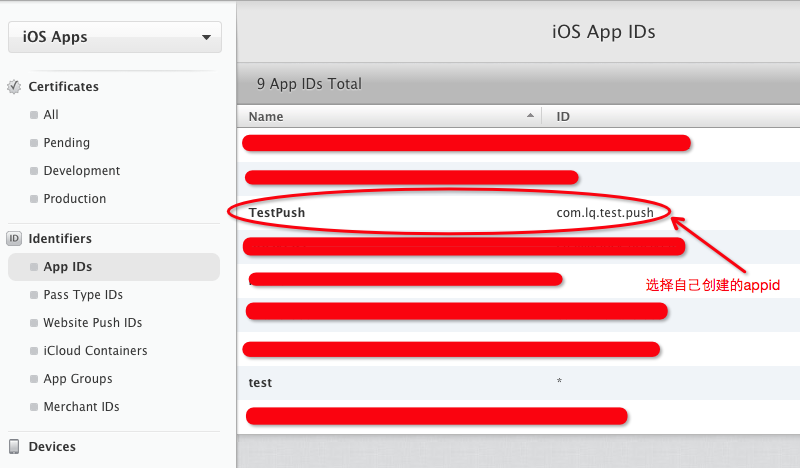
点击done后到初始页面,然后再次选择自己创建的appid,如下图:

在下图中选择edit按钮,配置推送的环境,如图:

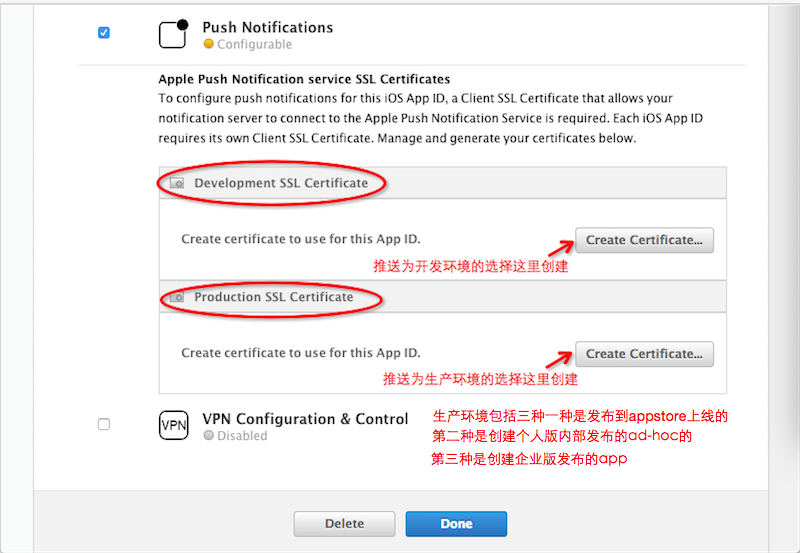
然后配置好对应的推送环境,个人版和企业版的开发环境都是选择创建Development SSL Certificate类型的。个人版和企业版的发布环境。发布环境分以下三种:1. in-house必须是企业开发账户(企业内)(299美金) 2.ad-hoc个人账户或公司Company账户(99美金),但只用于内部测试(总共100个设备).3.上线Appstore只能是个人账户或公司Company账户(99美金))如下图:

如果你是为已有的 App 增加消息推送功能,那么打开原有的 App ID,开启 Push Notification 选项即可。流程跟上面的一样。

创建及下载证书

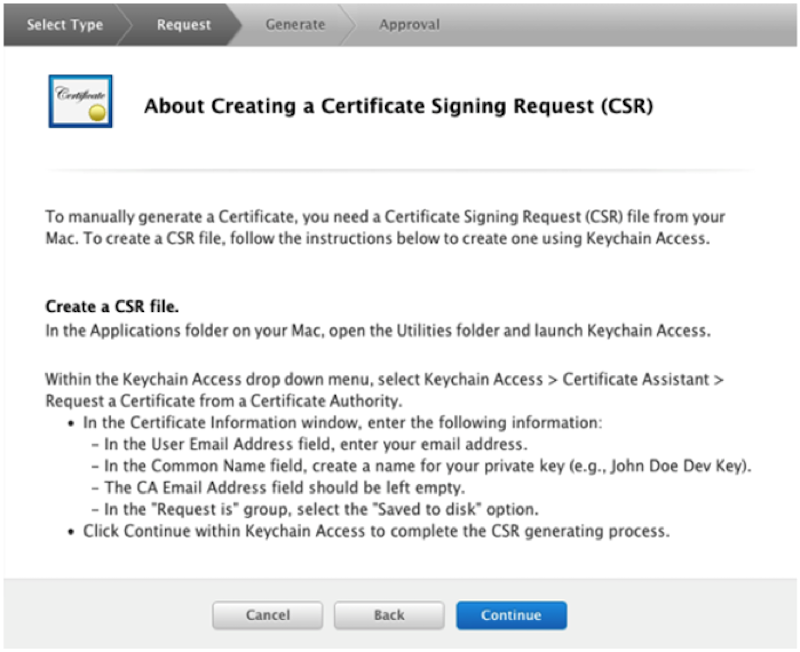
点击 Create Certificate按钮后会出现“About Creating a Certificate Signing Request (CSR)”,如下图:

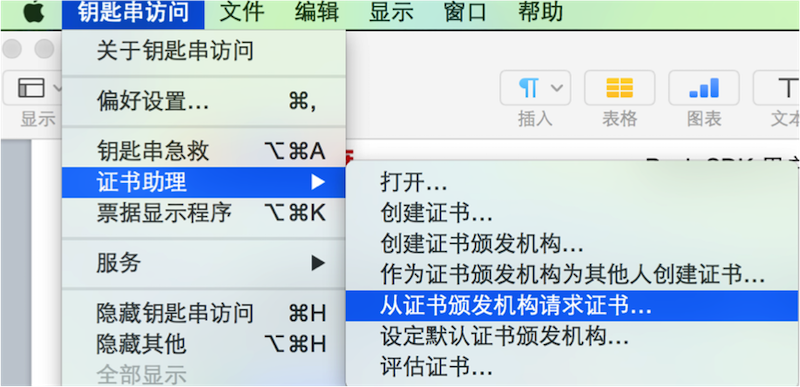
到了这里,需要停下制作 CSR 文件,制作过程比较简单,下面是制作的过程。打开 Mac 系统软件’钥匙串访问’,选择 ‘证书助理’ 及 ‘从证书颁发机构请求证书’,制作 CSR 文件,如下图:

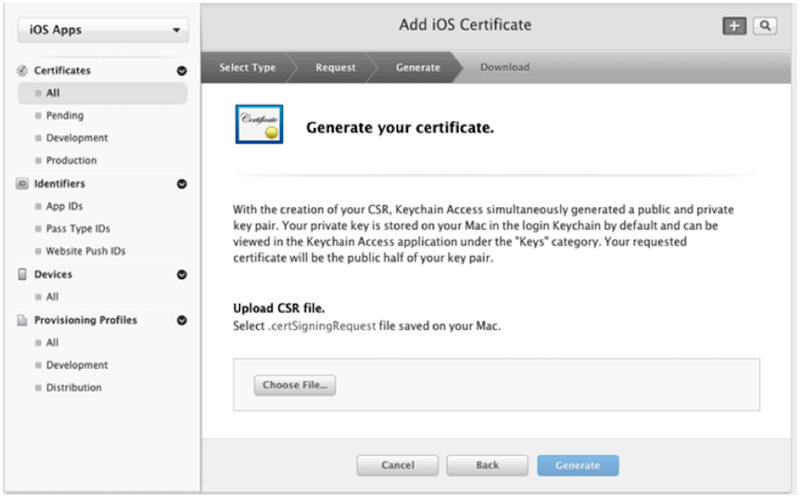
生成证书后,返回到 “About Creating a Certificate Signing Request (CSR)” 的界面,点击 continue,然后在 “Choose File” 选择生成的CSR文件,最后点击 Generate,生成证书。如下图:

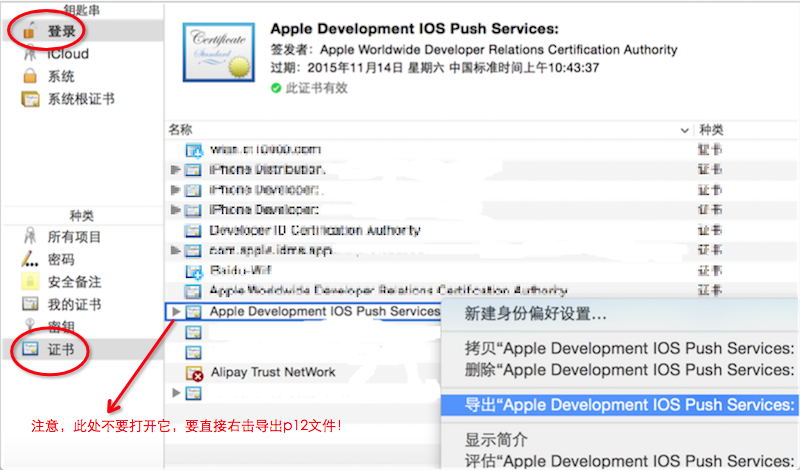
在证书制作已经完成。下载并双击用“钥匙串访问” 程序打开后,在左边一栏,上面选择登录,下面选择证书,然后选择刚刚打开的证书,切记不要展开它,直接右击导出p12,如下图:

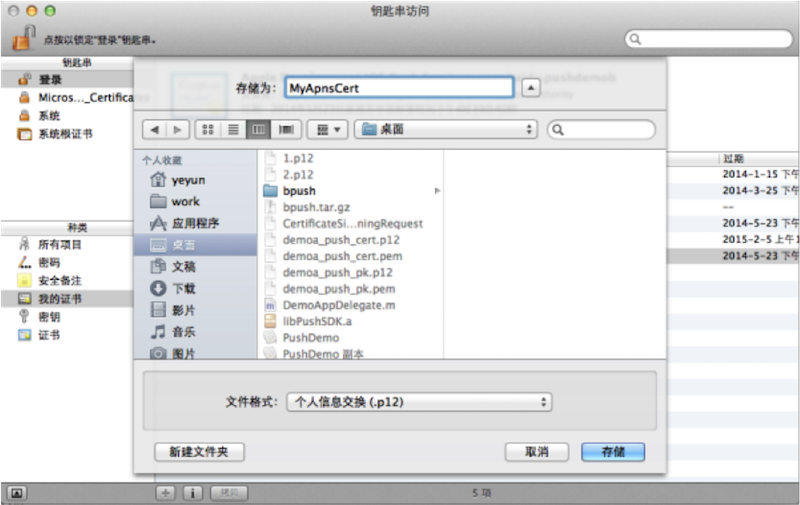
将文件保存为 .p12 格式,输入密码,如图所示:

最后进入终端,到证书目录下,运行以下命令将p12文件转换为pem证书文件:

1
openssl pkcs12 -in MyApnsCert.p12 -out MyApnsCert.pem -nodes

提示需要输入密码,输入刚才导出 p12 时的密码即可。

生成app

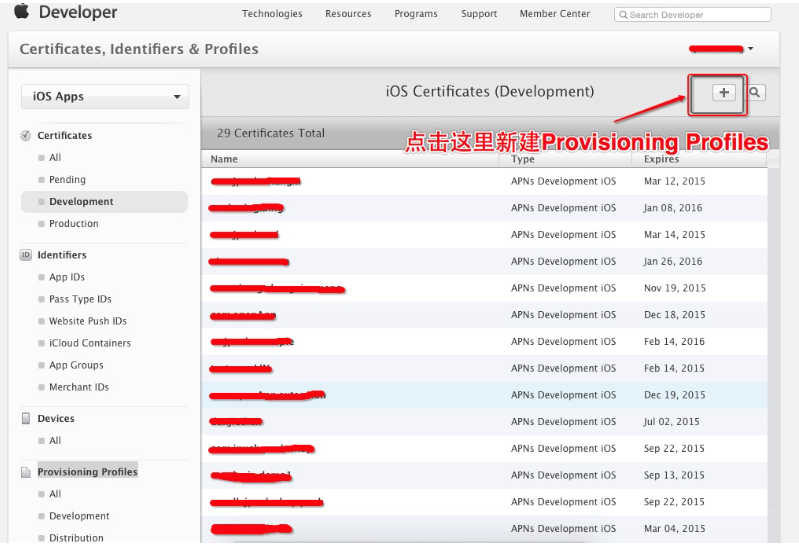
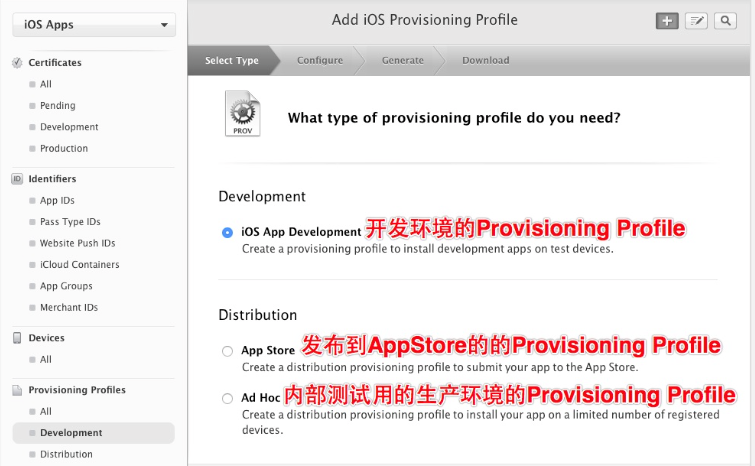
Provisioning Profile的创建 点击下图的+按钮开始创建profile

选择profile的环境

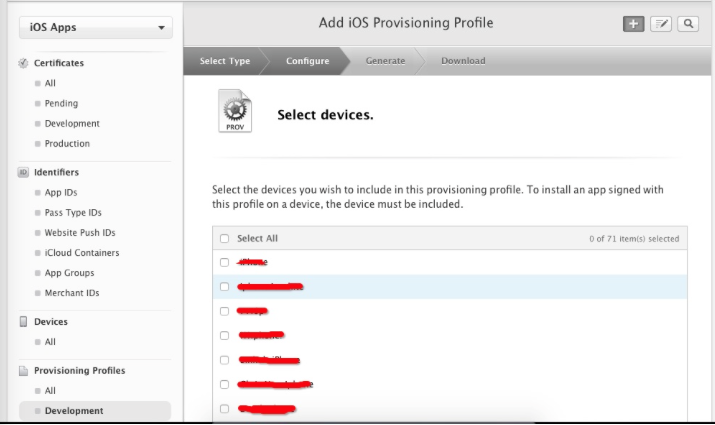
选择创建profile的appid和开发者证书,并选择设备,最后生成profile

最后下载profile配置到xcode中进行开发测试

iOS推送简介

1
2
3
4
5
6
7
8
在 iOS 设备上(模拟器无法使用推送),系统收到通知后这样处理:

在屏幕上弹出一些选项,或者在屏幕顶部显示横幅(banner)如下图左
App 的角标数值发生变化,具体表现为 App icon 右上角的小红点及数字,如邮件中的红点
伴随推送消息的提示声音
当应用处于前台运行时,系统是不会在屏幕上显示通知,但是仍会调用相应的 API。

只有真机可以使用推送功能。

推送证书验证

  1. 通知的两种推送环境
1
2
在使用 iOS 远程推送功能时,有两种不同的环境。开发环境(Development)以及生产环境(Production)。
App 当前使用的推送环境与 Xcode - Build Settings - Code Signing - Provisioning Profile 文件的模式一致。
  1. 证书与证书校验
1
2
3
4
5
6
7
8
9
10
11
12
13
14
15
16
17
18
19
与 APNs 之间是加密的连接,因此需要使用证书来加密连接。每个的推送环境有自己单独的推送证书,即开发证书和生产证书。

在将证书最终转为 pem 格式后,可通过与 APNs 连接来测试证书是否有效。

开发环境:

openssl s_client -connect gateway.sandbox.push.apple.com:2195 -cert MyApnsDev.pem

生产环境:

openssl s_client -connect gateway.push.apple.com:2195 -cert MyApnsPro.pem

当输入完命令回车后,终端首先会输出很多相关信息。

当连接建立失败时,会直接 close 掉。

当连接建立成功时,终端会停止输出,并等待你输入,你可以随便输入一些字符后摁回车,然后连接才会关闭。